FlatList: 从一个聊天消息列表谈起
缘起
昨天看到了 Android 上 Telegram 消息列表的动效,觉得比较有趣,便打算试着用 ReactNative 模仿一下。
PS:视频是从 macOS 端录制的,但是效果是一致的。
可以看到列表可视区域内最下面一条消息的用户的头像会随着列表的滚动而上下移动位置。
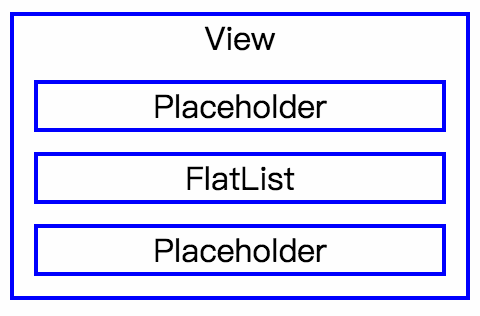
组件结构
外层容器
我们只关注中间的消息列表,所以头部和输入栏用 Placeholder 替代。列表使用 ReactNative 最新引入的 FlatList。
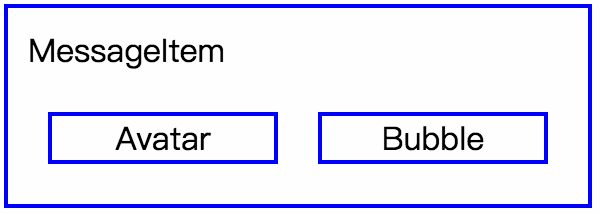
MessageItem
每一条消息分为左右两个部分,左侧是头像区域,头像图片在这里上下移动,右侧是消息气泡。
实现
先来设计消息项的数据结构,这里我使用 faker 来生成伪数据。
// util.js
import faker from 'faker';
import _ from 'lodash';

export const generateMsg = () => {
  const id = faker.random.uuid();
  const avatar = faker.internet.avatar();
  const author = faker.internet.userName();
  const content = faker.lorem[_.sample(['sentence', 'sentences', 'word', 'words'])]();
  const date = faker.date.past();

  const msg = {
    id,
    avatar,
    author,
    content,
    date,
  };

  return msg;
}
有了消息项的数据结构,我们就可以实现 MessageItem 组件。
MessageItem 分两部分:Avatar、Bubble:
// Avatar.js

import React from 'react';
import { View, Image, StyleSheet, Platform } from 'react-native';
import pure from 'recompose/pure';

const Avatar = pure((props) => {
  const { avatar, style, _props } = props;

  return (
    <View style={[styles.container, style]} {..._props}>
      <Image style={styles.avatar}
        source={{ uri: avatar }}
        resizeMode="contain" />
    </View>
  );
});

const styles = StyleSheet.create({
  container: {
    width: 50,
    height: 50,
    position: 'absolute',
    bottom: 0,
    left: 0,
  },
  avatar: {
    width: 50,
    height: 50,
    backgroundColor: 'transparent',
    overflow: 'hidden',
    ...Platform.select({
      ios: {
        borderRadius: 50 / 2,
      },
      android: {
        borderRadius: 50,
      }
    }),
  }
});

export default Avatar;
// Bubble.js
import React from 'react';
import { View, Text, StyleSheet } from 'react-native';
import pure from 'recompose/pure';
import moment from 'moment';
const Bubble = pure((props) => {
const { content, author, date } = props;
const time = moment(date).format('h:mm A');
return (
<View style={styles.container}>
<View style={styles.bubble}>
<Text style={styles.author}>{author}</Text>
<Text style={styles.content}>{content}</Text>
<Text style={styles.time}>{time}</Text>
</View>
</View>
);
});
const styles = StyleSheet.create({
container: {
display: 'flex',
flexWrap: 'wrap',
flexDirection: 'row',
},
bubble: {
backgroundColor: '#fff',
borderColor: '#ccc',
borderWidth: StyleSheet.hairlineWidth,
padding: 10,
borderRadius: 6,
},
author: {
color: 'blue',
fontSize: 12,
},
content: {
color: '#000',
fontSize: 18,
},
time: {
textAlign: 'right',
color: '#bababa',
fontSize: 12,
}
});
export default Bubble;合二为一:
// MessageItem.js

import React from 'react';
import { View, StyleSheet } from 'react-native';
import pure from 'recompose/pure';

import Avatar from './Avatar';
import Bubble from './Bubble';

class MessageItem extends React.Component {
  render() {
    const { msg } = this.props;

    const { avatar, content, author, date } = msg;

    return (
      <View style={styles.container}>
        <View style={styles.avatarWrapper}>
          <Avatar avatar={avatar} />
        </View>
        <View style={styles.bubbleWrapper}>
          <Bubble author={author} date={date} content={content} />
        </View>
      </View>
    );
  }
}

const styles = StyleSheet.create({
  container: {
    display: 'flex',
    flexDirection: 'row',
    alignItems: 'stretch',
    marginVertical: 4,
    marginHorizontal: 6,
  },
  avatarWrapper: {
    width: 50,
    display: 'flex',
    flexDirection: 'column',
    justifyContent: 'flex-end',
    borderTopWidth: 1,
    borderBottomWidth: 1,
    borderColor: 'red',
  },
  bubbleWrapper: {
    marginLeft: 6,
    flex: 1,
  }
});

export default MessageItem;
需要注意到的是尽可能使用纯函数组件来提升性能。
然后可以实现外部容器了。
Placeholder 比较简单,仅起到占位的作用。
// Placeholder.js

import React from 'react';
import { StyleSheet, Text, View } from 'react-native';

const Placeholder = (props) => {
  return (
    <View style={[styles.container, props.style]}>
      <Text style={styles.text}>Placeholder</Text>
    </View>
  )
};

const styles = StyleSheet.create({
  container: {
    height: 60,
    backgroundColor: 'grey',
    display: 'flex',
    alignItems: 'center',
    justifyContent: 'center',
  },
  text: {
    color: '#000',
    fontSize: 20
  }
});

export default Placeholder;
// App.js
import React from 'react';
import { StyleSheet, Text, View, FlatList, ScrollView } from 'react-native';
import _ from 'lodash';
import { generateMsg } from './util';
import Placeholder from './Placeholder';
import MessageItem from './MessageItem';
export default class App extends React.Component {
state = {
list: (function () {
const msgList = [];
for (let i = 0; i < 500; i++) {
msgList.push(generateMsg());
}
return msgList;
}())
};
itemRefs = [];
flatListBottom = 0;
bottomItemIndex = -1;
_keyExtractor = (item, index) => item.id;
_renderItem = ({ item, index }) => {
return (
<MessageItem
msg={item}
ref={item => this.itemRefs[index] = item}
/>
);
}
_placeItemAvatarWithRef = ({ listBottom, itemHeight, itemTop, ref }) => {
const itemBottom = itemTop + itemHeight;
const AVATAR_HEIGHT = 50;
let offset;
if ((listBottom - itemTop) < AVATAR_HEIGHT) {
offset = itemHeight - AVATAR_HEIGHT;
} else {
offset = itemBottom - listBottom;
if (offset < 0) offset = 0;
}
ref._setAvatarBottom(offset);
};
_placeItemAvatarAtIndex = (index) => {
const ref = this.itemRefs[index];
if (ref && typeof ref._measure === 'function') {
ref._measure((x, y, width, height, pageX, pageY) => {
this._placeItemAvatarWithRef({
listBottom: this.flatListBottom,
itemHeight: height,
itemTop: pageY,
ref: ref
});
});
}
};
_onScroll = (event) => {
const { nativeEvent } = event;
const bottomItemIndex = this.bottomItemIndex;
this._placeItemAvatarAtIndex(bottomItemIndex);
};
_onViewableItemsChanged = ({ viewableItems, changed }) => {
if (viewableItems.length === 0) { // 列表滚动过快时 viewableItems 可能为空
this.bottomItemIndex = -1;
} else {
const bottomItemIndex = viewableItems[viewableItems.length - 1].index;
this.bottomItemIndex = bottomItemIndex;
this._placeItemAvatarAtIndex(bottomItemIndex);
}
};
_handleFlatListLayout = (event) => {
const { nativeEvent } = event;
const { layout } = nativeEvent;
const { y, height } = layout;
this.flatListBottom = y + height;
};
render() {
const { list } = this.state;
return (
<View style={styles.container}>
<Placeholder />
<FlatList
keyExtractor={this._keyExtractor}
onLayout={this._handleFlatListLayout}
data={list}
onScroll={this._onScroll}
onViewableItemsChanged={this._onViewableItemsChanged}
renderItem={this._renderItem} />
<Placeholder />
</View>
);
}
}
const styles = StyleSheet.create({
container: {
flex: 1,
backgroundColor: '#f2f3f8',
}
});FlatList 一些接口的实现需要参考源代码。
由于需要随着列表的滚动而改变列表可视区域的底部头像图片的位置,所以我们用 onViewableItemsChanged 来知晓可视区域最下面的条目的 index,在 onScroll 中做处理。
我们需要知道 FlatList 底边的位置,所以使用 onLayout 来获取并保存到 flatListBottom。
现在回到 MessageItem 来实现 _measure 和 _setAvatarBottom 方法。
// Avatar.js
const Avatar = pure((props) => {
  const { avatar, style, avatarContainerRef, _props } = props;

  return (
    <View ref={avatarContainerRef} style={[styles.container, style]} {..._props}>
      <Image style={styles.avatar}
        source={{ uri: avatar }}
        resizeMode="contain" />
    </View>
  );
});
// MessageItem.js
class MessageItem extends React.Component {
_measure = (cb) => {
if (this.container) {
this.container.measure(cb);
}
}
_setAvatarBottom = (bottom) => {
const ref = this.avatarContainerRef;
if (ref) {
ref.setNativeProps({
bottom: bottom
});
}
}
shouldComponentUpdate(nextProps, nextState) {
if (nextProps.msg.id !== this.props.msg.id) return true;
if (nextState.avatarBottom !== this.state.avatarBottom) return true;
return false;
}
render() {
const { msg } = this.props;
const { avatarBottom } = this.state;
const { avatar, content, author, date } = msg;
return (
<View
renderToHardwareTextureAndroid={true}
style={styles.container}
ref={view => this.container = view} >
<View style={styles.avatarWrapper}>
<Avatar avatar={avatar}
avatarContainerRef={ref => this.avatarContainerRef = ref}
/>
</View>
<View style={styles.bubbleWrapper}>
<Bubble author={author} date={date} content={content} />
</View>
</View>
);
}
}修改元素的 bottom 值需要使用到 setNativeProps 来避免 setState 造成的额外开销。
这里我们实现了 shouldComponentUpdate 防止 MessageItem 组件不必要的更新。
基本大功告成了。
更进一步
滚动列表的时候,会发现有些头像的位置不对。
![]()
分析原因,是由于 onScroll 并不能保证 ._setAvatarBottom(0); 在 MessageItem 完整显示时被触发。所以对于完整显示的 MessageItem 我们可以在 onViewableItemsChanged 中进行处理。
// App.js

class App {
  _resetItemAtIndexes = (indexes) => {
    indexes.forEach(index => {
      const ref = this.itemRefs[index];
      if (ref) {
        ref._setAvatarBottom(0);
      }
    });
  }

  _onViewableItemsChanged = ({ viewableItems, changed }) => {
    if (viewableItems.length === 0) {
      this.bottomItemIndex = -1;
    } else {
      const bottomItemIndex = viewableItems[viewableItems.length - 1].index;
      this.bottomItemIndex = bottomItemIndex;
      this._placeItemAvatarAtIndex(bottomItemIndex);
      this._resetItemAtIndexes(
        viewableItems.map(item => item.index)
          .filter(index => index !== bottomItemIndex) // 找出所有完整显示的项目
      );
    }
  };
}
现在我们再来看下效果,
似乎并不尽如人意,通过 bottom 来修改 avatar 的位置并不流畅。
看来还有优化空间。
在 _placeItemAvatarAtIndex 中,由于 _measure 是异步的操作,可能在 measure 执行完成后,已不需要对对应的元素进行处理,所以可以在这里加个判断。
_placeItemAvatarAtIndex = (index) => {
  const ref = this.itemRefs[index];

  if (ref && typeof ref._measure === 'function') {
    this.currentMeasure = index;
    ref._measure((x, y, width, height, pageX, pageY) => {
      console.log(index !== this.currentMeasure);
      if (index !== this.currentMeasure) return; // 不需要执行后续操作,直接返回
      this._placeItemAvatarWithRef({
        listBottom: this.flatListBottom,
        itemHeight: height,
        itemTop: pageY,
        ref: ref
      });
    });
  }
};
考虑生成一个悬浮的 Avatar 在滚动 FlatList 的时候,动态显示隐藏,这样应该会更流畅。
// App.js

class App {
  state = {
    list: (function () {
      const msgList = [];
      for (let i = 0; i < 500; i++) {
        msgList.push(generateMsg());
      }
      return msgList;
    }()),
    currentFixedAvatarUri: '',
    showFixedAvatar: false
  };

  itemRefs = []; // 保存列表中元素的 ref
  flatListBottom = 0; // 列表 layout 的 bottom 值
  bottomItemIndex = -1;
  bottomItem = null;
  currentMeasure = -1; // 当前 measure 的元素的 index

  _showFixedAvatar() {
    this.setState({
      currentFixedAvatarUri: this.bottomItem.avatar
    });
  }

  _hideFixedAvatar() {
    this.setState({
      showFixedAvatar: false
    });
  }

  _onLoadFixedAvatar = (uri, index) => {
    // 判断载入完成的是否是当前待处理的 avatar
    if (this.bottomItem.avatar === uri) {
      const ref = this.itemRefs[index];
      if (ref) {
        this.setState({
          showFixedAvatar: true,
        });
        ref._setAvatarVisibility(false);
      }
    }
  }

  _placeItemAvatarWithRef = ({ listBottom, itemHeight, itemTop, ref, index }) => {
    const itemBottom = itemTop + itemHeight;
    const AVATAR_HEIGHT = 50;

    let offset;
    if ((listBottom - itemTop) < AVATAR_HEIGHT) {
      offset = itemHeight - AVATAR_HEIGHT;

      ref._setAvatarVisibility(true);
      this._hideFixedAvatar();
    } else {
      offset = itemBottom - listBottom;

      if (offset > 0) {
        this._showFixedAvatar();
      } else {
        ref._setAvatarVisibility(true);
        this._hideFixedAvatar();
      }
    }

    ref._setAvatarBottom(offset > 0 ? offset : 0);
  };

  _resetItemAtIndexes = (indexes) => {
    indexes.forEach(index => {
      const ref = this.itemRefs[index];
      if (ref) {
        ref._setAvatarBottom(0);
        ref._setAvatarVisibility(true);
      }
    });
  }

  _onViewableItemsChanged = ({ viewableItems, changed }) => {
    if (viewableItems.length === 0) {
      this.bottomItemIndex = -1;
    } else {
      const lastViewableItem = viewableItems[viewableItems.length - 1];
      this.bottomItem = lastViewableItem.item; // 记录当前底部元素
      const bottomItemIndex = lastViewableItem.index;
      this.bottomItemIndex = bottomItemIndex; // 记录当前底部元素的索引
      this._placeItemAvatarAtIndex(bottomItemIndex);
      this._resetItemAtIndexes(
        viewableItems.map(item => item.index)
          .filter(index => index !== bottomItemIndex)
      );
    }
  };

  render() {
    const { list, currentFixedAvatarUri, showFixedAvatar } = this.state;

    return (
      <View style={styles.container}>
        <Placeholder />
        <FlatList
          keyExtractor={this._keyExtractor}
          onLayout={this._handleFlatListLayout}
          data={list}
          onScroll={this._onScroll}
          onViewableItemsChanged={this._onViewableItemsChanged}
          renderItem={this._renderItem} />
        <Placeholder />
        <Avatar
          onLoad={this._onLoadFixedAvatar.bind(this, currentFixedAvatarUri, this.bottomItemIndex)}
          style={[styles.fixedAvatar, showFixedAvatar ? { opacity: 1 } : { opacity: 0 }]}
          avatar={currentFixedAvatarUri} />
      </View>
    );
  }
}

const styles = StyleSheet.create({
  container: {
    flex: 1,
    backgroundColor: '#f2f3f8',
  },
  fixedAvatar: {
    bottom: 60 + OFFSET,
    left: 6,
  }
});
// MessageItem.js
class MessageItem {
_setAvatarVisibility = (visible) => {
const ref = this.avatarContainerRef;
if (ref) {
ref.setNativeProps({
opacity: visible ? 1 : 0
});
}
}
}效果:
注意点:
- 通过
opacity属性控制元素的显示隐藏 - 监听 fixedAvatar 的
onLoad事件,避免图片加载造成显示的抖动