0%

在进行移动端页面开发中,会遇到从 web 页面唤起 Android 应用的需求。在 Android 系统中,可以使用自定义 scheme 来实现,但是这种方式在系统未安装对应应用的情况下,不好做 fallback。所以使用 intent: 会是更好的选择。

句法

使用户能够打开应用的最佳实践是构建一个 intent a 标签嵌入到页面。这可以更灵活的控制 app 如何运行,并能够通过 Intent Extras 传入 extra 到 app。

intent URI 的基本句法如下:

intent:
   HOST/URI-path // Optional host
   #Intent;
      package=[string];
      action=[string];
      category=[string];
      component=[string];
      scheme=[string];
   end;

可以加入下面的字符串来指定 fallback URL:

S.browser_fallback_url=[encoded_full_url]

当一个 intent 无法被执行或者外部应用无法运行时,用户会被跳转的 fallback 页面。

下面是一些 Chrome 无法运行外部应用的情况:

  • intent 无法被执行,如没有 app 可以处理这个 intent
  • JavaScript 定时器试图在没有用户交互的情况下打开一个应用

S.<name> 是一种用来定义字符串 extra 的方式。S.browser_fallback_url 被用来做向后兼容,但是目标应用是看不到 browser_fallback_url 的,因为 Chrome 会移除它。

示例

下面的 intent 可以用来打开 Zxing 条码扫描 App:

intent:
   //scan/
   #Intent;
      package=com.google.zxing.client.android;
      scheme=zxing;
   end;

a 标签是这样的:

<a href="intent://scan/#Intent;scheme=zxing;package=com.google.zxing.client.android;end"> Take a QR code </a>

加入 fallback URL:

<a href="intent://scan/#Intent;scheme=zxing;package=com.google.zxing.client.android;S.browser_fallback_url=http%3A%2F%2Fzxing.org;end"> Take a QR code </a>

Chrome Developer: Android Intents with Chrome

想要实现 async 函数的功能,首先要明白 async 函数有哪些特点。

  • 返回 Promise
  • async 函数中可以使用 await 等待 Promise

以上,我们可以使用 generator 来模拟实现 async 函数,因为 yield 同样可以用来暂停恢复函数的执行。

下面我们来看看 babel 是怎么转换 async/await 的。

const xxx = async () => {
  const val = await yyy();
  return val;
}

先分析下原始代码,定义一个async 函数 xxx,这个 async 函数里面使用 await 取得 async 函数 yyy 的值赋值给 val 并返回 val。

阅读全文 »

react SyntheticEvent

近日在开发 React 应用中发现 SyntheticEvent 是一个 Proxy 对象,比较好奇 SyntheticEvent 这里怎么用到了 Proxy,于是查看下 React 的源码。

/** Proxying after everything set on SyntheticEvent
 * to resolve Proxy issue on some WebKit browsers
 * in which some Event properties are set to undefined (GH#10010)
 */
if (__DEV__) {
  const isProxySupported =
    typeof Proxy === 'function' &&
    // https://github.com/facebook/react/issues/12011
    !Object.isSealed(new Proxy({}, {}));

  if (isProxySupported) {
    /*eslint-disable no-func-assign */
    SyntheticEvent = new Proxy(SyntheticEvent, {
      construct: function(target, args) {
        return this.apply(target, Object.create(target.prototype), args);
      },
      apply: function(constructor, that, args) {
        return new Proxy(constructor.apply(that, args), {
          set: function(target, prop, value) {
            if (
              prop !== 'isPersistent' &&
              !target.constructor.Interface.hasOwnProperty(prop) &&
              shouldBeReleasedProperties.indexOf(prop) === -1
            ) {
              warning(
                didWarnForAddedNewProperty || target.isPersistent(),
                "This synthetic event is reused for performance reasons. If you're " +
                  "seeing this, you're adding a new property in the synthetic event object. " +
                  'The property is never released. See ' +
                  'https://fb.me/react-event-pooling for more information.',
              );
              didWarnForAddedNewProperty = true;
            }
            target[prop] = value;
            return true;
          },
        });
      },
    });
    /*eslint-enable no-func-assign */
  }
}

可以看到 Proxy 被用来修改 SyntheticEvent 的 set 操作,当尝试向 SyntheticEvent 对象添加新的属性时,会弹出 warning。


create-react-app 可以很方便的初始化一个 React 项目,但是当我们需要完成一些特定需求的时候,便要 eject 来做定制化操作。

本文主要讲述在 create-react-app 创建的项目中使用 svg-sprite-loader 的方法,以及其中要注意的问题。

第一步:eject

$ yarn run eject

第二步:添加依赖

$ yarn add -D svg-sprite-loader svgo svgo-loader

第三步:修改配置

要启用 svg-sprite-loader 需要修改两个配置文件:config/webpack.config.dev.jsconfig/webpack.config.prod.js

module.rules.oneOf 中添加如下内容:

{
  test: /\.svg$/,
  use: [
    {
      loader: 'svg-sprite-loader'
    },
    {
      loader: 'svgo-loader'
    }
  ]
}

需要注意到的是,以上内容一定要添加到 oneOf 项下,而不是 rules。因为如果直接添加到 rules 下的话,会受到 oneOffile-loader 的影响。

缓存的分类

缓存可以被归类为两种主要的类别:私有缓存与共享缓存。共享缓存可以为不止一位用户的复用来储存响应。私有缓存独属于单个用户。

http cache type

私有浏览器缓存

浏览器的缓存会被用来前进、后退、保存、查看源文件等,不需要额外请求服务器。

共享代理缓存

ISP 或者你的公司可能会为许多用户架设代理来重用流行的资源、降低网络负载。

阅读全文 »

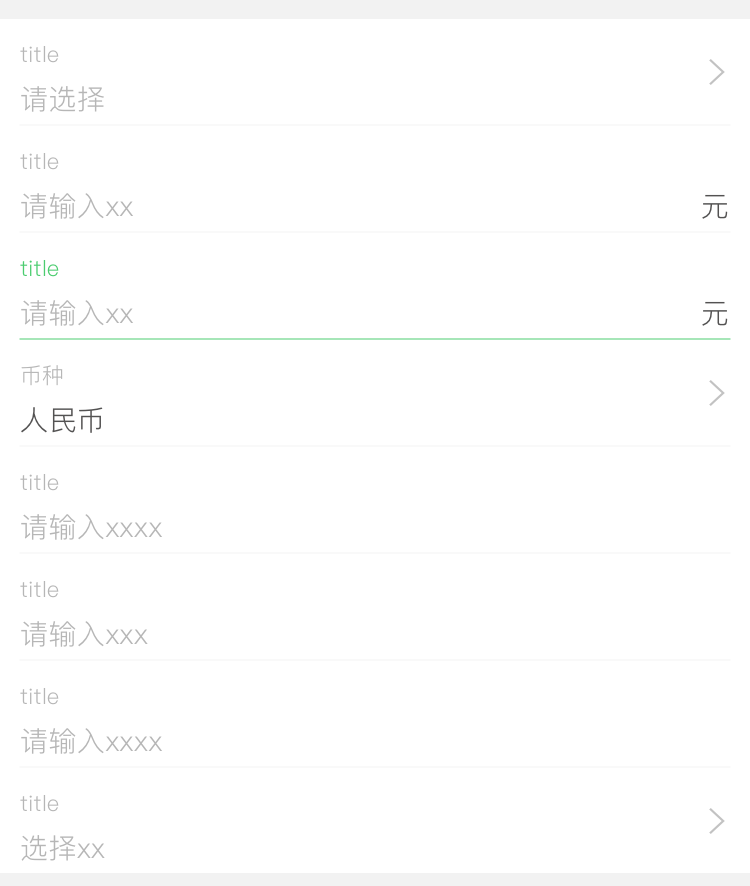
App 改版了,表单经过重新设计,需要实现新的表单组件。由于参考了 Material Design,故以 md 为命名空间。

设计如图:

new form design

可以将其拆分为以下几个组件:

名称 描述
md-form 多个表单组件的外层容器
md-form-item 表单项,用来包裹标题与输入组件等
md-form-label 表单项标题
md-input 输入组件-单行文本
md-select 输入组件-选择
md-textarea 输入组件-多行文本
阅读全文 »

想要深入了解 Virtual DOM,我们可以学习 snabbdom 这个库。Snabbdom 是一个专注简洁、模块化、高性能的虚拟 DOM 库。

用法如下:

var snabbdom = require('snabbdom');
var patch = snabbdom.init([ // Init patch function with chosen modules
  require('snabbdom/modules/class').default, // makes it easy to toggle classes
  require('snabbdom/modules/props').default, // for setting properties on DOM elements
  require('snabbdom/modules/style').default, // handles styling on elements with support for animations
  require('snabbdom/modules/eventlisteners').default, // attaches event listeners
]);
var h = require('snabbdom/h').default; // helper function for creating vnodes

var container = document.getElementById('container');

var vnode = h('div#container.two.classes', {on: {click: someFn}}, [
  h('span', {style: {fontWeight: 'bold'}}, 'This is bold'),
  ' and this is just normal text',
  h('a', {props: {href: '/foo'}}, 'I\'ll take you places!')
]);
// Patch into empty DOM element – this modifies the DOM as a side effect
patch(container, vnode);

var newVnode = h('div#container.two.classes', {on: {click: anotherEventHandler}}, [
  h('span', {style: {fontWeight: 'normal', fontStyle: 'italic'}}, 'This is now italic type'),
  ' and this is still just normal text',
  h('a', {props: {href: '/bar'}}, 'I\'ll take you places!')
]);
// Second `patch` invocation
patch(vnode, newVnode); // Snabbdom efficiently updates the old view to the new state

由于它仅有约 200 行源码容易阅读,支持 JSX,并且 Vue 的 patch.js 便是在它的基础上进行些许修改得来的,所以非常值得学习。

阅读全文 »

VNode 意即虚拟节点,每一个 VNode 对应一个 DOM Element。操作 VNode,Vue 会对变化进行 patch 操作,最后根据新的 VNode,进行 node-ops 生成 DOM 树。

graph LR
Component -- createElement --> VNode
VNode -- patch --> DOM
DOM -- platforms/web/runtime/node-ops.js --> Node
class VNode {
  tag: string | void;
  data: VNodeData | void;
  children: ?Array<VNode>;
  text: string | void;
  elm: Node | void;
  ns: string | void;
  context: Component | void; // rendered in this component's scope
  key: string | number | void;
  componentOptions: VNodeComponentOptions | void;
  componentInstance: Component | void; // component instance
  parent: VNode | void; // component placeholder node

  // 私有属性
  raw: boolean; // contains raw HTML? (server only)
  isStatic: boolean; // hoisted static node
  isRootInsert: boolean; // necessary for enter transition check
  isComment: boolean; // empty comment placeholder?
  isCloned: boolean; // is a cloned node?
  isOnce: boolean; // is a v-once node?
  asyncFactory: Function | void; // async component factory function
  asyncMeta: Object | void;
  isAsyncPlaceholder: boolean;
  ssrContext: Object | void;
  fnContext: Component | void; // real context vm for functional nodes
  fnOptions: ?ComponentOptions; // for SSR caching
  fnScopeId: ?string; // functioanl scope id support
}

近日看到 vuejs-templates/webpack更新记录中介绍了 eslint-plugin-vue。由于它不包含如分号这类代码风格相关的规范,只加强了 Vue 相关的规范,能够和 standard 与 airbnb 这类样式共存,所以决定在项目中采用。

安装

yarn add -D eslint eslint-plugin-vue

eslintrc 的 extends 项中添加 plugin:vue/essential

module.exports = {
  extends: [
    // add more generic rulesets here, such as:
    // 'eslint:recommended',
    'plugin:vue/essential'
  ],
  rules: {
    // override/add rules settings here, such as:
    // 'vue/no-unused-vars': 'error'
  }
}

注意事项

如果使用了其它的 parser(如 "parser": "babel-eslint"),需要将它移到 parserOptions 中,这样就不会与 vue-eslint-parser 冲突:

- "parser": "babel-eslint",
  "parserOptions": {
+     "parser": "babel-eslint",
      "ecmaVersion": 2017,
      "sourceType": "module"
  }

原来的项目中有使用 eslint-plugin-html,它会与 eslint-plugin-vue 冲突,使用时需要移除。

阅读全文 »

定义 Reactive 属性

通过 Object.defineProperty 可以为一个对象设置具有 gettersetter 的属性,于是,我们可以为一个对象添加 reactive 的属性。

function defineReactive (obj, key, val) {
  Object.defineProperty(obj, key, {
    get: function reactiveGetter () {
      return val
    },
    set: function reactiveSetter (newVal) {
      console.log(`${key} is set to ${newVal}`)
      val = newVal
    }
  })
}

const apple = {}

defineReactive(apple, 'color', 'red')
console.log(apple.color)  // -> 'red'
apple.color = 'yellow'  // color is set to yellow

定义 computed 属性

function defineComputed (target, key, computeFunc, updateCb) {
  Object.defineProperty(target, key, {
    get: function computedGetter() {
      // evaluate computeFunc and return value
      return computeFunc()
    },
    set: function computedSetter() {
      // noop
    }
  })
}
阅读全文 »