0%

async.js

/* @flow */

// 定义一个函数 runQueue。这个函数接受一个参数列表 queue,一个函数 fn,一个回调 cb。它会对 queue 中的每一项依次调用 fn,并在最后结束时调用回调函数 cb
export function runQueue (queue: Array<?NavigationGuard>, fn: Function, cb: Function) {
  const step = index => {
    if (index >= queue.length) {
      cb()
    } else {
      if (queue[index]) {
        fn(queue[index], () => {
          step(index + 1)
        })
      } else {
        step(index + 1)
      }
    }
  }
  step(0)
}

dom.js

/* @flow */

// 根据是否有全局变量 `window` 判断当前运行环境
export const inBrowser = typeof window !== 'undefined'

path.js

/* @flow */

// 将 relative 与 base 合成完整路径
export function resolvePath (
  relative: string,
  base: string,
  append?: boolean
): string {
  const firstChar = relative.charAt(0)
  if (firstChar === '/') {
    return relative
  }

  if (firstChar === '?' || firstChar === '#') {
    return base + relative
  }

  const stack = base.split('/')

  // remove trailing segment if:
  // - not appending
  // - appending to trailing slash (last segment is empty)
  if (!append || !stack[stack.length - 1]) {
    stack.pop()
  }

  // resolve relative path
  const segments = relative.replace(/^\//, '').split('/')
  for (let i = 0; i < segments.length; i++) {
    const segment = segments[i]
    if (segment === '..') {
      stack.pop()
    } else if (segment !== '.') {
      stack.push(segment)
    }
  }

  // ensure leading slash
  if (stack[0] !== '') {
    stack.unshift('')
  }

  return stack.join('/')
}

// 将传入的 path 分成 path, query, hash 三部分
export function parsePath (path: string): {
  path: string;
  query: string;
  hash: string;
} {
  let hash = ''
  let query = ''

  const hashIndex = path.indexOf('#')
  if (hashIndex >= 0) {
    hash = path.slice(hashIndex)
    path = path.slice(0, hashIndex)
  }

  const queryIndex = path.indexOf('?')
  if (queryIndex >= 0) {
    query = path.slice(queryIndex + 1)
    path = path.slice(0, queryIndex)
  }

  return {
    path,
    query,
    hash
  }
}

// 将传入 path 中的 // 替换成 /
export function cleanPath (path: string): string {
  return path.replace(/\/\//g, '/')
}

params.js

/* @flow */

import { warn } from './warn'
import Regexp from 'path-to-regexp'  // path-to-regexp 用来将 `/user/:name` 这样的字符串转换成正则表达式

// $flow-disable-line
const regexpCompileCache: {
  [key: string]: Function
} = Object.create(null)

// 将 params 中的对应的参数填入 path 中,返回填充后的路径
export function fillParams (
  path: string,
  params: ?Object,
  routeMsg: string
): string {
  try {
    const filler =
      regexpCompileCache[path] ||
      (regexpCompileCache[path] = Regexp.compile(path))
    return filler(params || {}, { pretty: true })
  } catch (e) {
    if (process.env.NODE_ENV !== 'production') {
      warn(false, `missing param for ${routeMsg}: ${e.message}`)
    }
    return ''
  }
}

query.js

/* @flow */

import { warn } from './warn'

const encodeReserveRE = /[!'()*]/g
const encodeReserveReplacer = c => '%' + c.charCodeAt(0).toString(16)
const commaRE = /%2C/g

// 使 encodeURIComponent 更符合 RFC3986 标准
// - 转义 [!'()*]
// - 保留逗号
const encode = str => encodeURIComponent(str)
  .replace(encodeReserveRE, encodeReserveReplacer)
  .replace(commaRE, ',')

const decode = decodeURIComponent

// 根据 query 字符串与 extraQuery 键值对生成键值对
export function resolveQuery (
  query: ?string,
  extraQuery: Dictionary<string> = {},
  _parseQuery: ?Function
): Dictionary<string> {
  const parse = _parseQuery || parseQuery
  let parsedQuery
  try {
    parsedQuery = parse(query || '')
  } catch (e) {
    process.env.NODE_ENV !== 'production' && warn(false, e.message)
    parsedQuery = {}
  }
  for (const key in extraQuery) {
    parsedQuery[key] = extraQuery[key]
  }
  return parsedQuery
}

// 将 query 字符串转换成键值对
function parseQuery (query: string): Dictionary<string> {
  const res = {}

  query = query.trim().replace(/^(\?|#|&)/, '')

  if (!query) {
    return res
  }

  query.split('&').forEach(param => {
    const parts = param.replace(/\+/g, ' ').split('=')
    const key = decode(parts.shift())
    const val = parts.length > 0
      ? decode(parts.join('='))
      : null

    if (res[key] === undefined) {
      res[key] = val
    } else if (Array.isArray(res[key])) {
      res[key].push(val)
    } else {
      res[key] = [res[key], val]
    }
  })

  return res
}

// 将 query 键值对 encode,然后转成 `?key1=val1&key2=val2 这样的字符串
export function stringifyQuery (obj: Dictionary<string>): string {
  const res = obj ? Object.keys(obj).map(key => {
    const val = obj[key]

    if (val === undefined) {
      return ''
    }

    if (val === null) {
      return encode(key)
    }

    if (Array.isArray(val)) {
      const result = []
      val.forEach(val2 => {
        if (val2 === undefined) {
          return
        }
        if (val2 === null) {
          result.push(encode(key))
        } else {
          result.push(encode(key) + '=' + encode(val2))
        }
      })
      return result.join('&')
    }

    return encode(key) + '=' + encode(val)
  }).filter(x => x.length > 0).join('&') : null
  return res ? `?${res}` : ''
}

location.js

/* @flow */

import type VueRouter from '../index'
import { parsePath, resolvePath } from './path'
import { resolveQuery } from './query'
import { fillParams } from './params'
import { warn } from './warn'

export function normalizeLocation (
  raw: RawLocation,
  current: ?Route,
  append: ?boolean,
  router: ?VueRouter
): Location {
  let next: Location = typeof raw === 'string' ? { path: raw } : raw
  // named target
  if (next.name || next._normalized) {
    return next
  }

  // relative params
  if (!next.path && next.params && current) {
    next = assign({}, next)
    next._normalized = true
    const params: any = assign(assign({}, current.params), next.params)
    if (current.name) {
      next.name = current.name
      next.params = params
    } else if (current.matched.length) {
      const rawPath = current.matched[current.matched.length - 1].path
      next.path = fillParams(rawPath, params, `path ${current.path}`)
    } else if (process.env.NODE_ENV !== 'production') {
      warn(false, `relative params navigation requires a current route.`)
    }
    return next
  }

  const parsedPath = parsePath(next.path || '')
  const basePath = (current && current.path) || '/'
  const path = parsedPath.path
    ? resolvePath(parsedPath.path, basePath, append || next.append)
    : basePath

  const query = resolveQuery(
    parsedPath.query,
    next.query,
    router && router.options.parseQuery
  )

  let hash = next.hash || parsedPath.hash
  if (hash && hash.charAt(0) !== '#') {
    hash = `#${hash}`
  }

  return {
    _normalized: true,
    path,
    query,
    hash
  }
}

function assign (a, b) {
  for (const key in b) {
    a[key] = b[key]
  }
  return a
}

归一化

Z值(Z score)

标准值(Standard Score):给定一个观察值 x,Z 值表示 x 偏离均值多少个标准差。

$$ Z = \frac{x - \mu}{\sigma} $$

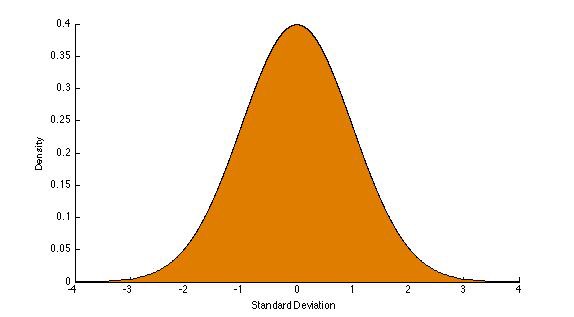
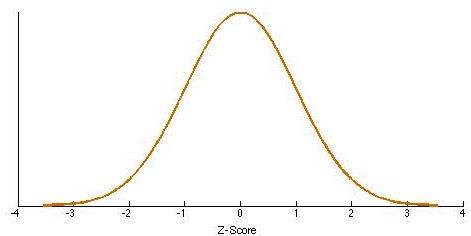
标准正态曲线(Standard Normal Curve):标准正态曲线是归一化的结果。我们使用这个分布与 Z 值表来计算给定值之上、之下、之间的百分比。

The Standard Normal Curve

正态分布

概率分布函数(Probability Distribution Function)

概率分布函数(PDF)是一个下面面积为 1 的正态曲线,用来表示值的累积频率。

the area beneath the curve is 1

使用 Z 值表找出概率

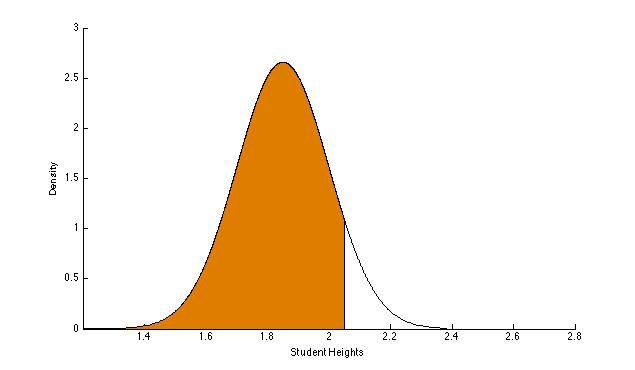
例:某私立大学学生的平均身高是 1.85m,标准差为 0.15m。求身高低于 2.05m 的学生的比例。

85% is the shaded area

解决此题要先计算出 Z 值:$$ z = \frac{x - \mu}{\sigma} = \frac{2.05 - 1.85}{0.15} = 1.\bar{3} $$

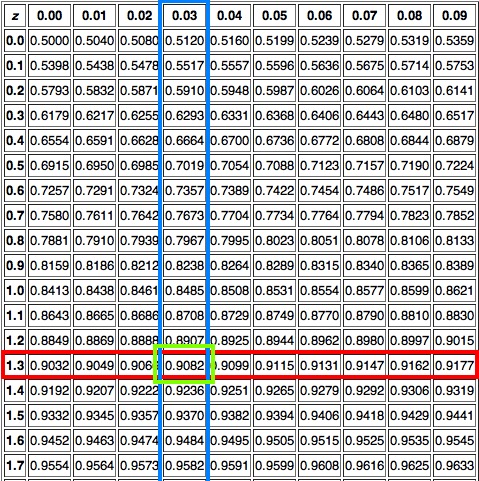
然后从 Z 值表中找出 Z 值低于 1.33 的比例。

如图:

z-table

查表得 $90.82\%$

sw-precache 是一个用来生成预加载资源的 ServiceWorker 的 js 文件的模块。将它用到 Ghost 上后,发现它并不能正常工作,原来 Ghost 会自动给 asset 中的静态文件加上 ?v=#######,而 sw-precache 里记录的是原始的文件名,并不匹配。所以对 sw.js 修改了一下。

// sw.js

var url = event.request.url;
if (/\.(js|css)(\?|$)/.test(url) && /^https?:\/\/(blog\.ihanai\.com|cdnjs\.cloudflare\.com)/.test(url)) {
  event.respondWith(
    caches.open(cacheName).then(function (cache) {
      return setOfCachedUrls(cache).then(function (cachedUrls) {
        // If we don't have a key matching url in the cache already, add it.
        var cacheKey = event.request.url;
        if (!cachedUrls.has(cacheKey)) {
          return fetch(event.request).then(function (response) {
            if (response.ok || response.type === 'opaque') {
              cleanResponse(response).then(function (responseToCache) {
                return cache.put(cacheKey, responseToCache);
              });
            }
            return response.clone();
          });
        } else {
          return cache.match(cacheKey).then(function (response) {
              if (response) return response;
              throw Error('The cached response that was expected is missing.');
            })
            .catch(function (e) {
              console.warn('Couldn\'t serve response for "%s" from cache: %O', event.request.url, e);
              return fetch(event.request);
            });
        }
      });
    })
  );
}

这里有点需要注意的是使用 response.clone() 避免 TypeError。

当然,这样改了之后,功能变了,由原来的预加载资源文件变成了将部分文件使用 ServiceWorker 作缓存了。

最简单的方法还是修改 sw-precache 的配置,增加 ignoreUrlParametersMatching: [/^utm_/, /^v$/],这样 sw-precache 就能忽略 assetHash 了。由于生成的 sw.js 文件里有对资源 hash 的记录,所以忽略 Ghost 生成的 assetHash 并不会有什么不好的影响。

说点其它的,使用上面所说的方法将所以 js、css 资源文件用 ServiceWorker 缓存之后发现较 from disk cache 变慢了,原因在于随着 fetch 事件触发次数的增加,sw.js 中的一些代码如 setOfCachedUrlscaches.open 执行了一次又一次,很多结果是相同的,但是并没有缓存,所以实际使用中可以考虑对其进行定制化修改。

统计研究方法入门

建构

建构(Constructs,即抽象概念):建构是任何难以衡量的东西,因为它可以用许多不同的方式来定义和衡量。

操作定义(Operational Definition):建构的操作定义是我们用于度量建构的单位。 一旦我们在操作上定义了一些东西,它就不再是一个建构。

例:容量是一个建构。我们知道容量是某物占据的空间,但我们还没有定义如何度量这个空间(即升、加仑等)。当我们要用来度量容量的时候,它不再是一个建构,而是操作定义。

例:分钟已被操作定义了,我们正在测量的东西没有含糊之处。

总体与样本

总体(Population):一个群体中的所有个体。
样本(Sample):一个群体中的部分个体。

参数(Parameter)与统计值(Statistic):参数定义总体的特征,统计值定义样本的特征。

例:总体的平均值用符号 $\mu$ 定义,样本的平均值用 $\bar x$ 定义。

实验

治疗组(Treatment Group):接受不同程度自变量的研究小组,这些小组被用来衡量治疗的效果。

对照组(Control Group):一个没有得到任何治疗的研究小组。这个组被用作比较治疗组的基线。

安慰剂(Placebo):给对照组的受试者一些东西,让他们认为他们正在接受治疗,而实际上他们正在得到一些对他们没有任何影响的东西。(例如糖丸)

盲法(Blinding):盲法是一种用来减少偏见的技术。双盲法可确保执行治疗和接受治疗的患者不知道接受哪种治疗。


数据可视化

频率

频率(Frequency):数据集的频率是某个结果发生的次数。

histogram

这个直方图显示从 0-5 学生测试的分数。我们看到没有学生得 0 分,8 名学生得 1 分。这些数字就是学生成绩的频率。

比例(Proportion):比例是计数除以总样本的分数。比例可以通过乘以 100 来变成百分数。

例:使用上面的直方图,我们可以看出得 1 分学生的比例为 $\frac{8}{39} \approx 0.2051$ 或 $20.51\%$

阅读全文 »

  • 双自变量(A、B 两组)
  • 连续的因变量
  • 每个因变量的观察值独立于其他因变量的观察值(其概率分布不受其值影响)。例外:对于相依样本 t 检验(paired t-test),我们只需要每对的差异($\mathrm A_i - \mathrm B_i$)彼此独立
  • 因变量服从正态分布,在每组中具有相同的方差 $\sigma^2$(就好像组 $\mathrm A$ 的分布仅仅被移动而成为组 $\mathrm B$ 的分布,而不改变形状)

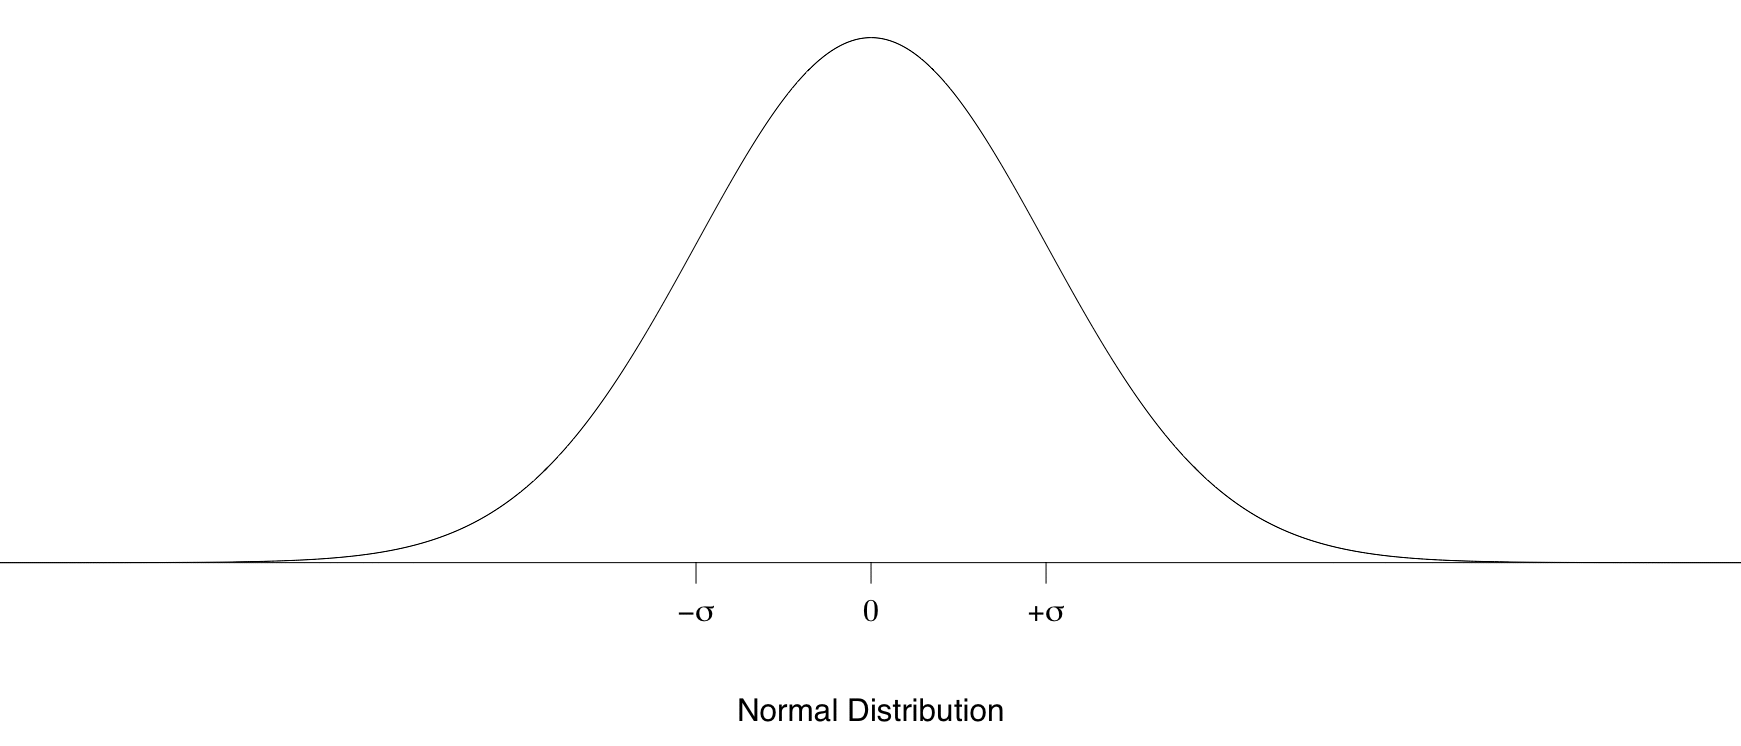
normal-sigma

注:正态分布的标度参数 $\sigma$ 也称为总体标准偏差,在正态曲线的图片上很容易看到。$\sigma$ 位于正常平均值的左侧或右侧的曲线从凸面变为凹面(二阶导数为零)的位置。


Cornell CSIC Elrod: Assumptions for the t-test

排版

LaTeX 的书写有两种模式:inline 与 display。inline 表达式与文字渲染在行内,而 display 表达式独占一行。

inline 模式的表达式:$e^{i\pi} + 1 = 0$

display 模式的表达式:$$e^x = \sum_{n=0}^\infty \frac{x^n}{n!}$$

写 inline 表达式时,要使用单个 $ 符号,$y=mx+b$ 输出 $y=mx+b$。创建 display 表达式时,使用两个 $ 符号,$$P(A\mid B) = \frac{P(B\mid A)P(A)}{P(B)}$$ 输出 $$P(A\mid B) = \frac{P(B\mid A)P(A)}{P(B)}$$

上标下标

$x^2$ $x^2$

$e^2x$ $e^2x$

$e^{2x}$ $e^{2x}$

$x_i$ $x_i$

$_{10}C_5 $_{10}C_5$

指令

特殊符号与格式使用指令书写,写作 \command。例如:创建一个平方根的根号,$\sqrt{2\pi}$ 生成 $\sqrt{2\pi}$。{} 包裹根号下的内容,\pi 渲染出希腊字母 pi($\pi$)。分数使用 \frac 命令显示,它接受两个分别被括号包裹的输入值,一个是分子,一个是分母。

符号

符号以 \symbol 书写。

  • 希腊字母 \alpha, \beta, \gamma:$\alpha$, $\beta$, $\gamma$。大写 \Phi, \Gamma:$\Phi$, $\Gamma$。由于 beta 的大写形式就是 $\mathrm{B}$,所以没有 \Beta
  • 操作符 \times, \pm, \cup, \oplus:$\times$, $\pm$, $\cup$, $\oplus$
  • 三角函数 \sin, \cosh, \arctan:$\sin$, $\cosh$, $\arctan$
  • 关系 \leq, \geq, \approx, \neq:$\leq$, $\geq$, $\approx$, $\neq$
  • 三点 \cdots, \ldots, \ddots:$\cdots$, $\ldots$, $\ddots$
  • 其它 \infty, \nabla, \partial:$\infty$, $\nabla$, $\partial$

撇号

  • 加一个 hat \hat x $\hat x$,给多个字母加 hat \widehat{abs} $\widehat{abs}$
  • 加一个 bar \bar x $\bar x$,给多个字母加 bar \overline{abs} $\overline{abs}$
  • 小圆点 \dot x $\dot x$, \ddot x $\ddot x$
  • 箭头 \vec{x} $\vec{x}$, \overrightarrow{xy} $\overrightarrow{xy}$

圆括号、方括号和花括号

圆括号和方括号默认是没有『弹性』的,也就是说它们不会延伸达到内容完整的高度,例如 z = (\frac{dx}{dy})^{1/3}

$$
z = (\frac{dx}{dy})^{1/3}
$$

为了使括号延伸,要使用 \left\right,如 $$z = \left(\frac{dx}{dy}\right)^{1/3}$$

$$
z = \left(\frac{dx}{dy}\right)^{1/3}
$$

还有一些无法用键盘创建的特殊的括号。

  • 使用 |\vert 的垂直线,如 $|x|$ 或 $\vert x \vert $。使用 \mid 作括号中间的线。$P(A\vert B)$ 使用 \vert,而 $P(A\mid B)$,使用 \mid
  • 尖括号:$\langle \phi \mid \psi \rangle$ 输出 $\langle \phi \mid \psi \rangle$
  • 矩阵的组括号:\left\lgroup \matrix{a & b\cr c & d} \right\rgroup $$\left\lgroup \matrix{a & b\cr c & d} \right\rgroup$$
阅读全文 »

实际开发中,项目会在多种环境中运行,如 localdev 或者 test 等。我们可以依据不同的运行环境进行配置,使用 docker-compose 来更方便的部署应用。

项目结构

.
├── Dockerfile
├── README.md
├── config
│   ├── config.default.js
│   ├── config.dev.js
│   ├── config.local.js
│   ├── config.prod.js
│   ├── config.sandbox.js
│   ├── config.test.js
├── docker-compose.yml
├── env
│   ├── common.env
│   ├── dev.env
│   ├── local.env
│   ├── prod.env
│   ├── sandbox.env
│   └── test.env
├── package.json
├── view
└── yarn.lock

配置

# Dockerfile
FROM node:8-alpine
ADD . /code
WORKDIR /code
RUN yarn install
# docker-compose.yml
version: '2.1'
services:
  app-local:
    env_file:
      - ./env/common.env
      - ./env/local.env
    build:
      context: .
      args:
        NPM_REGISTRY: "https://registry.npm.taobao.org"
    ports:
      - "7005:7005"
    depends_on:
      - redis
    links:
      - redis
    volumes:
      - - /path/to/view:/code/view
      - ./app:/code/app
    command: ["npm", "run", "dev"]
  app-dev:
    env_file:
      - ./env/common.env
      - ./env/dev.env
    build:
      context: .
      args:
        NPM_REGISTRY: "https://registry.npm.taobao.org"
    ports:
      - "7005:7005"
    depends_on:
      - redis
    links:
      - redis
    volumes:
      - - /path/to/view:/code/view
    command: ["npm", "run", "start"]
  app-test:
    env_file:
      - ./env/common.env
      - ./env/test.env
    build:
      context: .
      args:
        NPM_REGISTRY: "https://registry.npm.taobao.org"
    ports:
      - "7005:7005"
    depends_on:
      - redis
    links:
      - redis
    volumes:
      - /path/to/view:/code/view
    command: ["npm", "run", "start"]
  app-sandbox:
    env_file:
      - ./env/common.env
      - ./env/sandbox.env
    build:
      context: .
      args:
        NPM_REGISTRY: "https://registry.npm.taobao.org"
    ports:
      - "7005:7005"
    depends_on:
      - redis
    links:
      - redis
    volumes:
      - /path/to/view:/code/view
    command: ["npm", "run", "start"]
  app-prod:
    env_file:
      - ./env/common.env
      - ./env/prod.env
    build:
      context: .
      args:
        NPM_REGISTRY: "https://registry.npm.taobao.org"
    ports:
      - "7005:7005"
    volumes:
      - /code/view
    command: ["npm", "run", "start"]
  redis:
    image: redis:3.2-alpine
    expose:
      - "6379"

部署

build 镜像

$ docker-compose build app-local
$ docker-compose build app-dev
$ docker-compose build app-prod

运行

$ docker-compose up -d app-local
$ docker-compose up -d app-dev
$ docker-compose up -d app-prod

网上看到好多开启 BBR 的方法都是从源码编译 Linux 内核,然而现在一些发行版的 tcp_bbr module 已是直接可用的,所以只需在 /etc/sysctl.conf 中启用即可。

判断是否有已编译好的 tcp_bbr 模块

$ find /lib/modules/$(uname -r)/kernel/ -iname "*bbr*"
/lib/modules/4.10.0-40-generic/kernel/net/ipv4/tcp_bbr.ko

/etc/sysctl.conf 中启用 BBR

$ sudo bash -c 'echo "net.ipv4.tcp_congestion_control=bbr" >> /etc/sysctl.conf'

应用变动

$ sudo sysctl -p

管理实例

在传统的 UI 模型中,由你管理子组件实例的创建销毁。如果有个 From 想要渲染一个 Button 组件,它需要创建它的实例,并手动根据新的数据更新。

class Form extends TraditionalObjectOrientedView {
  render() {
    // Read some data passed to the view
    const { isSubmitted, buttonText } = this.attrs;

    if (!isSubmitted && !this.button) {
      // Form is not yet submitted. Create the button!
      this.button = new Button({
        children: buttonText,
        color: 'blue'
      });
      this.el.appendChild(this.button.el);
    }

    if (this.button) {
      // The button is visible. Update its text!
      this.button.attrs.children = buttonText;
      this.button.render();
    }

    if (isSubmitted && this.button) {
      // Form was submitted. Destroy the button!
      this.el.removeChild(this.button.el);
      this.button.destroy();
    }

    if (isSubmitted && !this.message) {
      // Form was submitted. Show the success message!
      this.message = new Message({ text: 'Success!' });
      this.el.appendChild(this.message.el);
    }
  }
}

每一个组件的实例都需要保存它的 DOM 节点以及子组件的实例,并在合适的时间创建、更新、销毁它们。代码行数随着组件可能的状态增多增长的很快,并且父组件可以直接访问子组件的实例,使得未来很难将它们解耦。

那么 React 有什么不同呢?


使用 Element 描述树状结构

Element 是描述组件实例或者 DOM 节点及其属性的 plain 对象。一个 Element 并不是实例,不能从它调用任何方法。它有两个字段 type: (string | ReactClass)props: Object

DOM Elements

当 element 的 type 为字符串时,它表示一个 DOM 节点。

{
  type: 'button',
  props: {
    className: 'button button-blue',
    children: {
      type: 'b',
      props: {
        children: 'OK!'
      }
    }
  }
}

Component Elements

当 element 的 type 为函数或类时,它表示一个 React 组件。

{
  type: Button,
  props: {
    color: 'blue',
    children: 'OK!'
  }
}

就像描述 DOM 节点,描述组件的 element 依旧是 element。它们之间可以相互嵌套混合。


组件封装 Element 树

当 React 看到 element 的 type 是函数或类时,它会询问组件要渲染什么 element,给它对应的 props

例如如下 element:

{
  type: Button,
  props: {
    color: 'blue',
    children: 'OK!'
  }
}

React 会询问 Button 它要渲染什么,而 Button 会返回如下 element:

{
  type: 'button',
  props: {
    className: 'button button-blue',
    children: {
      type: 'b',
      props: {
        children: 'OK!'
      }
    }
  }
}

React 会重复这个过程直到获得每个组件下面的 DOM 标签。

返回的 element 树可以包含描述 DOM 节点的 element 和描述其他组件的 element。这使您可以在不依赖内部 DOM 结构的情况下编写独立的 UI 部分。

我们让 React 创建、更新和销毁实例,我们使用从组件返回的 element 来描述它们,而 React 负责管理这些实例。


组件可以是类或函数

有三种大致等价的声明组件的方式:

// 1) 作为接受 props 的函数
const Button = ({ children, color }) => ({
  type: 'button',
  props: {
    className: 'button button-' + color,
    children: {
      type: 'b',
      props: {
        children: children
      }
    }
  }
});

// 2) 使用 React.createClass() 工厂函数
const Button = React.createClass({
  render() {
    const { children, color } = this.props;
    return {
      type: 'button',
      props: {
        className: 'button button-' + color,
        children: {
          type: 'b',
          props: {
            children: children
          }
        }
      }
    };
  }
});

// 3) 使用 ES6 class 继承自 React.Component
class Button extends React.Component {
  render() {
    const { children, color } = this.props;
    return {
      type: 'button',
      props: {
        className: 'button button-' + color,
        children: {
          type: 'b',
          props: {
            children: children
          }
        }
      }
    };
  }
}

使用 class 来定义组件时,它比函数式组件更强大。它可以保存一些本地状态,并在对应 DOM 节点创建销毁时执行自定义的逻辑。

无论函数或类,它们本质上都是 React 组件。它们接受 props 作为输入,返回 element 作为输出。


由上而下 Reconciliation

调用:

ReactDOM.render({
  type: Form,
  props: {
    isSubmitted: false,
    buttonText: 'OK!'
  }
}, document.getElementById('root'));

React 会给 Form 组件 props,获得返回的 element 树。它将逐渐 refine 它对组件树的理解,以简单的原语表示。

{
  type: Form,
  props: {
    isSubmitted: false,
    buttonText: 'OK!'
  }
}

// 从 From 找到 Button
{
  type: Button,
  props: {
    children: 'OK!',
    color: 'blue'
  }
}

// 从 Button 找到 button
{
  type: 'button',
  props: {
    className: 'button button-blue',
    children: {
      type: 'b',
      props: {
        children: 'OK!'
      }
    }
  }
}

这部分处理被 React 称作 reconciliation,它在 ReactDOM.render()setState() 时执行。reconciliation 结束后,React 获知最终的 DOM 树,像 react-domreact-native 那样的 render 会采取最小的改动来更新 DOM 节点(或者 React Native 那样特定平台的视图)。

这个逐渐 refining 的过程也是 React 应用易于优化的原因。如果组件树的某些部分变得太大而无法高效地被 React 访问,那么你可以告诉它如果相关的 props 没有改变,就跳过这个 refiningdiffing。如果 props 是不可变(immutable)的,计算 props 是否改变的速度非常快。所以可以同时使用 React 和 immutability,并且可以用最小的工作提供很大的优化。

只有类组件有实例,并且你不应该直接创建它们,React 为你做了这些。虽然父组件实例访问子组件实例的机制存在,但它们仅用于必要的操作(例如设置焦点在字段上),通常应避免。

React 负责为每个类组件创建一个实例,因此可以用方法和本地状态以面向对象的方式编写组件,但除此之外,实例在React的编程模型中并不是非常重要,并且由 React 本身来管理。


总结

element 是描述 DOM 节点或其它组件的 plain 对象。elememt 可以在 props 中包含其它 elememt。创建 element 很容易。一旦创建后它不可修改。

一个组件可以用几种不同的方式来声明。它可以是一个带有 render() 方法的类。在简单的情况下,它可以被定义为一个函数。无论哪种情况,都需要 props 作为输入,并返回一个 elememt 树作为输出。

一个实例就是在类组件中用 this 引用的。这对于存储本地状态和对生命周期事件做出反应非常有用。

函数式组件没有实例,类组件有实例。

创建 elements 要使用 React.createElement()JSX 或者一个 element 工厂函数。不要在实际代码中用纯对象写 elements。


延伸阅读


注:由于安全原因,所有的 React emelents 需要一个额外的 $$typeof: Symbol.for('react.element') 字段定义在对象上。


React Blog: React Components, Elements, and Instances
GIF MP4
tom-and-jerry
1 MB 122 KB

Convert

$ ffmpeg -f gif -i Desktop/tom-and-jerry.gif -pix_fmt yuv420p -c:v libx264 -movflags +faststart -filter:v crop='floor(in_w/2)*2:floor(in_h/2)*2' Desktop/tom-and-jerry.mp4